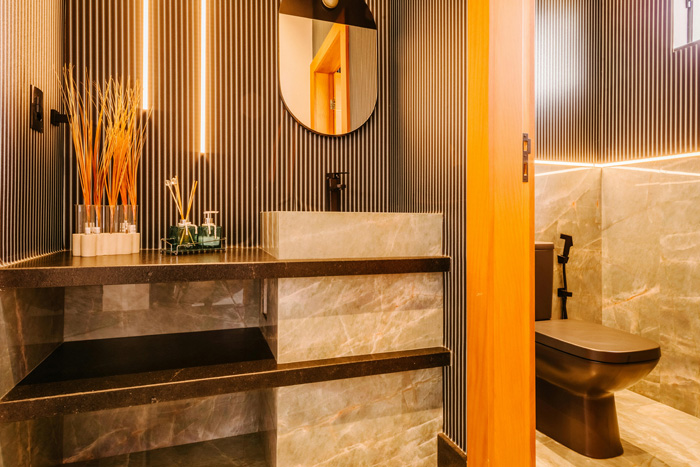
A solid wood bathroom vanity brings warmth, durability, and a timeless look to your bathroom. But installing one properly takes planning, the right tools, and care—especially when dealing with wood (which reacts to moisture and movement). This guide walks you through each step needed to install your new solid wood bathroom vanity so that it looks great and lasts for years.
Why Choose a Solid Wood Bathroom Vanity?
- Durability: Solid wood is strong and long-lasting compared to particle board or MDF.
- Appearance and Finish: It offers natural beauty—grain, texture, and the possibility of staining or painting while keeping a premium look.
- Repairability: Scratches can be sanded; hardware replaced; surfaces refinished.
- Value: Adds quality feel to your bathroom, which may enhance resale value.
But: solid wood requires extra attention to moisture sealing, installation, and ventilation to avoid warping, swelling, or damage.
Before You Begin: Planning & Measurement
- Measure the Space Carefully
- Width, height, depth of vanity space.
- Door swing, clearance, plumbing, electrical fixtures.
- Flooring level—solid wood vanity must sit flat.
- Width, height, depth of vanity space.
- Check Wall & Floor Conditions
- Wall studs behind where the vanity will be mounted.
- Wall surface needs to be stable; repair if needed.
- Floor should be solid, level; use shims if needed.
- Wall studs behind where the vanity will be mounted.
- Ventilation and Local Codes
- Bathrooms must have enough ventilation to reduce moisture exposure (which damages solid wood).
- Check local codes for plumbing clearance, sink height, electrical outlet spacing, etc.
- Bathrooms must have enough ventilation to reduce moisture exposure (which damages solid wood).
- Pre-Finish Considerations
- Decide if you’ll stain or seal the wood and when (before or after installation).
- Order or get the solid wood vanity pre-sealed on all sides to protect from moisture.
- Decide if you’ll stain or seal the wood and when (before or after installation).
Tools & Materials You’ll Need
| Tools | Materials |
| Stud finder | Solid wood vanity cabinet |
| Level | Vanity top / countertop |
| Tape measure | Sink and faucet |
| Drill with bits | Plumbing fittings (supply lines, P-trap, etc.) |
| Screwdrivers | Caulk (silicone, waterproof) |
| Hole saw (if needed) | Wood sealant / polyurethane (for finishing) |
| Clamps (optional) | Shims for leveling |
| Utility knife | Screws, wall anchors |
| Safety glasses / ear protection | Sandpaper (fine grit) |
Step-by-Step Installation
Step 1: Remove the Old Vanity & Prepare the Area
- Turn off water supply.
- Disconnect plumbing: supply lines, P-trap, etc. Catch water in bucket.
- Remove old vanity, sink.
- Patch or repair wall / floor surfaces. Allow any new drywall or patch to dry completely.
Step 2: Prepare the Solid Wood Vanity
- Inspect the cabinet: ensure it’s level, straight, no warping.
- If not already, seal all edges (inside, underside) with a moisture-blocking finish. Solid wood absorbs moisture from all sides.
- If the vanity has doors or drawers, consider removing them now for easier handling.
Step 3: Position & Level the Vanity
- Place vanity in approximate location.
- Use shims under the base if floor is uneven.
- Use a level across top front edge and side edges. Adjust shims until level.
- Mark wall stud locations behind.
Step 4: Secure the Vanity to the Wall
- Pre-drill through back panel into studs. Use sufficiently long screws (e.g., 3″ screws) appropriate for solid wood & wall type.
- If the vanity is very heavy or wide, use at least two studs (preferably three) for better support.
- For floating vanities or wall-hung solid wood vanities, ensure mounting bracket or cleat system is rated for weight and corrosion resistant.
Step 5: Install Sink, Faucet & Countertop
- If countertop is separate, set vanity top in place, ensure it is level.
- Apply a bead of waterproof sealant between cabinet and countertop/backslash.
- Install the sink (drop-in, undermount, vessel as per your sink type). Secure with clips or brackets.
- Install faucet, drain hardware. Use plumber’s tape on threaded connections. Tighten carefully to avoid cracking wood.
Step 6: Connect Plumbing & Test for Leaks
- Reconnect supply lines. Turn water on slowly.
- Check faucet, drain, P-trap for leaks. Tighten connections as needed.
- Let water run, check under cabinet for water infiltration.
Step 7: Finishing Touches & Seal
- Apply caulk around edges: between wall and backsplash, at joints. Use color that matches or complements finish.
- Install hardware (handles, knobs).
- If needed, sand lightly and reapply sealant / polyurethane for protection. Particularly important around sink and water-exposed surfaces (countertop edges, inside of drawers).
Tips & Common Pitfalls
- Avoid too much moisture exposure: solid wood may swell if edges are unsealed.
- Don’t over-tighten screws or plumbing: wood cracks more easily than composites.
- Allow solid wood to acclimate: let vanity sit in your house for a couple days, so humidity adjusts.
- Use rust-resistant hardware: drawer slides, hinges, screws should resist moisture.
- Backup plan for plumbing misalignments: sometimes supply or drain pipes are not in ideal place; have sink base with hole, or be ready to adjust.
- Protect floor & surfaces during installation: wood sawdust, caulk etc. can stain or damage finishes.
FAQ: Solid Wood Bathroom Vanity Install
Q: How long does it take to install a solid wood bathroom vanity? A: For someone with basic DIY skills: about 4-6 hours, depending on sink type, flooring level, and plumbing complexity.
Q: Should I stain solid wood before or after installation? A: Best practice is to pre-finish (stain + seal) before installation, especially on bottoms and sides. Touch-ups after install are OK.
Q: Can I install a solid wood vanity by myself? A: You can, but it helps to have one assistant, especially when placing and securing heavy wood and connecting plumbing.
Q: Do I need special tools for solid wood vs engineered wood? A: Not really special, but you need quality saw blades, moisture-resistant finishes, and more patience.
Final Thoughts
A solid wood bathroom vanity turns what might be a standard install into a feature piece of craftsmanship. The natural beauty of wood, when properly installed, sealed, and maintained, enriches your bathroom in both look and longevity.
By measuring carefully, sealing properly, leveling and securing correctly, and paying attention to plumbing and finishing, you can achieve a flawless and durable installation. Take your time, do the preparation, and enjoy the result
If you like, I can also prepare a printable checklist for installing a solid wood bathroom vanity, or suggest maintenance tips to keep it beautiful for years.