How To Start A Food Blog
So you want to start a food blog? Congratulations! You’re about to embark on a journey that will be both challenging and rewarding. Food is a passion many people share, and on a food blog, everyone can come together and share what they know and love. There are many ways you can go about it, that said, here are a few steps you can consider when starting your own food-related platform.
Let me guess what prompted you to be here.
- You love food.
- You love taking photos of food.
- You would love to chronicle those divine morsels you’ve eaten so you’d still have them even when they’re gone.
- And your friends told you that you should start a food blog.
The first three points up there are the reasons why I started this food blog. I needed an outlet where I can store photos of food I’ve eaten and made…. immortalize them and share them with whoever wants to read them.
Ten years ago, I have no idea how to start blogging. It took me days learning how to put up a blog and have it running. It would have been nice to have someone beside me to help me along the way.
If you’ve decided to take the plunge to food blogdom today, then today is your lucky day because I’m gonna share with you a step-by-step guide on how you can start your blog. You’ll have it up and running in 30 minutes and you can start sharing your thoughts, recipes, and cravings with the world.
Get that cup of coffee ready, sit comfortably in your chair,…….. and let’s do this!
Step-By-Step Guide to Starting a Food Blog
1. Choose your Domain Name
This is the most exciting part in starting a blog.
If I didn’t know you, I’ll tell you to think about your name and choose carefully. But I’m pretty sure you already have a name in mind for your food blog right now.
If you already have a name, then I suggest you head on to a hosting site and enter your domain to see if it is still available. (Crossing my fingers it still is!).
2. Choose Your Hosting Provider
If you already have a domain name, you’ll need a host for it. A host is like a renting space where you can display your blog. You must choose a trustworthy hosting provider to make sure your blog is always up and running. Your host will affect your blog’s speed and accessibility at all times.
I recommend you choose a reliable hosting service that provides premium customer service, reliability and usability plus expert, in-house technical support provided 24 hours a day, 7 days a week. Aside from that they have great rates. Some will even you your domain FREE FOR ONE YEAR when you decide to host with them. Make sure you get one of the best web hosting services.
Congratulations! You now have a domain name and a hosting account.
3. Installing WordPress
Now that you’re done with registration, you’ll need to install WordPress. Get a host that will make it easy for you and has a website that’s easy to navigate.
Once WordPress is fully installed, it will provide you with your site URL, the admin login URL, your username, and password. You will get a copy of this information, except your password, in your email as well. Make sure to keep it in a safe place.
Type your Admin URL into your web browser. You’ll see a login screen like the one below. Enter your Username and Password you copied down from the previous step.
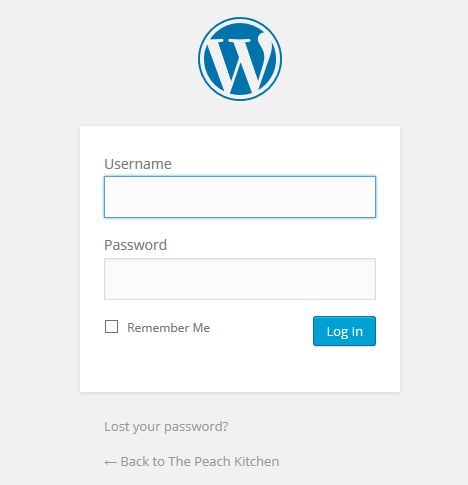
Weeee! Congratulations! You are now officially logged in to your blog! You must be stoked!
4. Getting Started on Your Blog
It’s now to time to design your blog and make it pretty! You can choose from all the free WordPress themes here.
Now go out, conquer the food blogging world and then share all your gorgeous food photos and blog away!
Welcome to the Blogosphere!